
Call of Duty Warzone 2 is a battle royal e-game and the sequel to Call of Duty Warzone. It is developed by Infinity Ward and Raven Software, and published by Activision. It was initially released in November 2022 and become a popular game in the world of E-Sports. It has already achieved multiple recognitions and is currently available on multiple gaming platforms including PSP, Xbox, and Microsoft Windows.
In this game, one of the playable modes is named DMZ, and inside that mode is the map of Building 21. In this article, I am providing you with a guide to Find, Complete, and Loot Building 21 in CoD Warzone 2 DMZ.
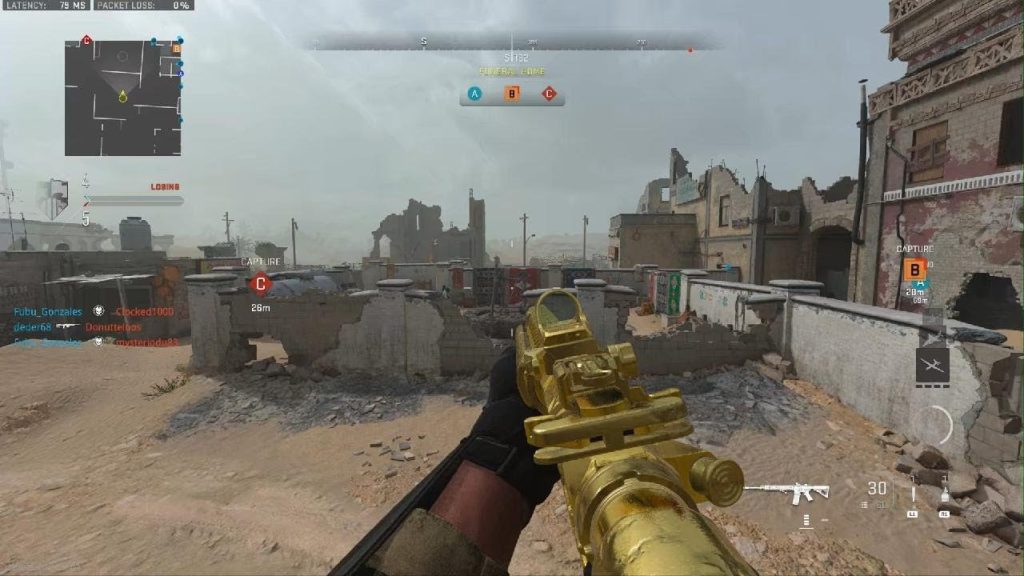
Introduction of Building 21 in COD Warzone 2.0 DMZ
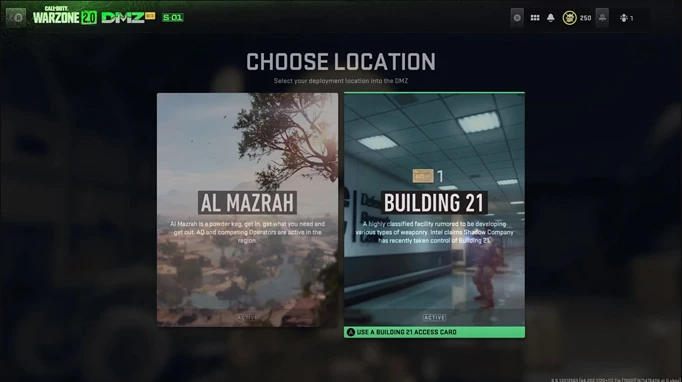
You can log on to the Building 21 location by following these steps:
- First, enter the DMZ mode in CoD Warzone 2.0
- Now, You have 2 locations on your screen, select Building 21 (as this is a different location than AL Mazrah).
- And, you’re ready to explore the location.
Remember, In order to enter Building 21, you need keycards (found inside an orange container in AL Mazrah) and only then you can get access to Building 21.
Ways to Complete Building 21 in CoD Warzone 2.0 DMZ
Once you and your team get the keycards and are ready to complete the Building 21 map, you should enter through the west side on level one (as there are three levels in Building 21). Now, find the server room and hack the server to deactivate the security system (as there are a tons of enemies outside). Once you’re done with deactivating the server, now you and your team needs to split and one member should stay inside the server room. All other members of the team should focus on completing the missions as soon as possible and then head to the third level to collect armory. The armory is located behind the orange door on the northeast side of level three. Now, you can access the elevator to escape.
List of Rewards on Completion of Building 21
There are total six rewards you and your team will receive after successfully completing the Building 21 map. These are as follows:
- Camo Cloud Vehicle Skin
- Company Sniper Emblem
- Going Bark Weapon Charm
- Roar Weapon Sticker
- Silver Tox Chimera Blueprint
- Weapon Rover Calling Card
For more updates and news on E-Games and E-Sports, Stay Tuned to BullScore.
READ MORE: Ways to Defeat Dragon-type Pokemon, Their weaknesses, Immunity, List included
Guide to Get Sildihn Potsherds in Final Fantasy XIV
Guide to Defeat Sleeping Dragon in Elden Ring

The Crown has assigned the Call of Duty Warzone 2 DMZ players the task of traversing Ashika Island as part of the Intel Exchange mission. In addition to locating the elusive key to the Lost Room 403, the players are required to track down the room itself. As with most keys in DMZ, they are obtained randomly, and once found, it’s advisable to promptly head to their designated locations. This applies to the key for the Lost Room 403, and whether acquired through loot or as part of the mission, the location of the room is provided here.
Steps to Find the Lost Room 403

To locate the Lost Room 403, head towards the western side of Ashika Island, and look for a building situated between the Beach Club and Town Center. An image of the exact location is provided for reference.
However, it’s important to note that the building may also appear as a stronghold, so players should come equipped with a stronghold keycard as a precautionary measure. Upon entering the building, players will encounter hostile enemies that need to be eliminated to progress further. Using the lift cables, players can reach the second floor and locate Lost Room 403 on the left side of the hallway. The key for the Lost Room 403 is randomly generated in DMZ and can be obtained through looting, defeating AI enemies, or completing the HVT contract.
Once players use the key to access Lost Room 403, they will be rewarded with various valuable items such as cash, weapon caches, and ground loot. The loot is plentiful enough to accommodate multiple players, so it is recommended to visit the location with friends to make the most of the rewards.
READ MORE: Best Loadout Options for Lachmann 556 in Call of Duty Warzone 2
Call of Duty Warzone 2 DMZ: Ashika Island Beach
When playing Call of Duty DMZ, you’ll need to carry out tasks for four factions, each having its own AI opponents scattered across the maps. Each faction has five levels of missions that can be accomplished. However, at the beginning of the game, only White Lotus’ Tier One missions will be accessible. To unlock Tier Two missions for White Lotus and Tier One missions for Legion, you must finish all the tasks, including Stronghold Reacquisition.
Break Check is a Tier Two White Lotus mission with three unique objectives. One of the objectives requires you to visit the Zaya Observatory POI on the Al Mazrah map and collect a hard drive from a car crash site. Zaya Observatory is a heavily guarded POI where you’ll find several AI combatants. It is tough to infiltrate this location, which is why you need to know exactly where to find the crash site near Zaya Observatory.
Guide to Find the Crash Site

When playing DMZ, you have the freedom to pick from three maps to infiltrate: Al Mazrah, Ashika Island, and Building 21. The Break Check mission starts on the Al Mazrah map, which is also where you can find the car crash site. Before you start playing, be sure to select the Break Check mission from the faction missions section to ensure that it is your active mission during the game. The car crash site is located at map sector E6, to the south of the Zaya Observatory POI.
To locate the car crash site on the Al Mazrah map, refer to the yellow circle on the map image above. We suggest approaching the location from the south of the Zaya Observatory POI and making use of the zip lines to ascend the cliff. This approach will enable you to evade confrontation with the AI combatants entirely. Descend the mountain from the other side, and you’ll come across the crash site on the right-hand side of the road. Examine the car to find the Ashika Island Security Hard Drive lying on the ground.
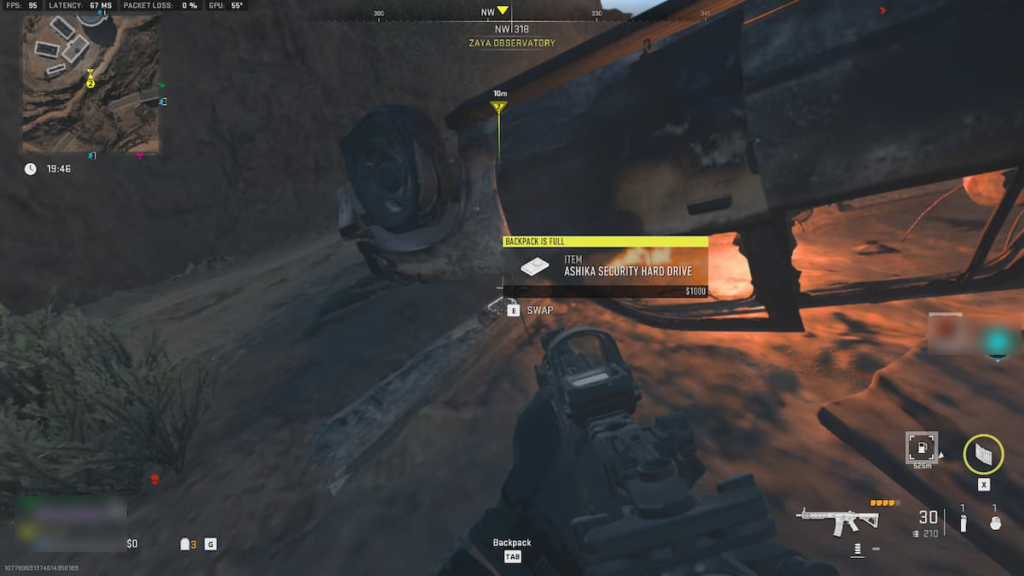
Successfully retrieving and extracting the Ashika Island Security Hard Drive is crucial for completing the Break Check White Lotus Faction mission in DMZ. It’s important to note that only one hard drive spawns per match, so if you don’t find it at the crash site, try again in another match. Since other operators are also likely to visit this location, we highly recommend heading to the car crash site as soon as you spawn on the Al Mazrah map. Utilize a vehicle to reach the location quickly and secure the hard drive before anyone else can.
After obtaining the Ashika Island Security Hard Drive from the crash site, immediately make your way toward the extraction point. The second part of the Break Check mission involves extracting the item from your backpack. Avoid getting into conflicts with opponents after obtaining the item and utilize a vehicle to reach any of the extraction points quickly. If you manage to extract the hard drive successfully, make sure to queue into Ashika Island for the next match. On Ashika Island, you’ll need to visit the Waterways dead drop location to deposit the item.
READ MORE: COD MW2 And Warzone 2 Weapons Balancing: All Nerfs & Buffs In Season 3
Call Of Duty Vanguard: How To Enable Split Screen?
Call of Duty players is facing an error (or some nasty bugs) in Warzone 2. For many gamers, a dev error is a critical issue that can ruin their gameplay experience, causing them to be abruptly kicked out of the game and sent back to the main menu or lobby. This type of error often occurs at the worst possible moment, such as when they are in the middle of an intense Warzone 2 session or attempting to achieve a nuke in Modern Warfare 2 multiplayer.
Unfortunately, there is usually little that can be done to prevent these errors from happening, but there are some measures that players can take to minimize their impact. In this article, we will delve into dev error 615, another common problem that players encounter in Call of Duty.
Steps to fix dev error 615
When encountering a dev error in Call of Duty, it indicates an issue on the game’s side, leaving players with no immediate solution until developers release a patch to fix the problem. Despite this, there are several troubleshooting steps players can take to try to resolve the issue and get back to playing their favorite game modes, such as MW2 multiplayer, Warzone 2, or DMZ runs.
Many Call of Duty players has reported experiencing dev error 615 when attempting to climb or hang from a ledge in MW2, Warzone 2, or DMZ. As this is a specific issue, it is likely to require a fix from Infinity Ward through a patch. However, it is always a good idea to ensure that both your game and device are up to date.
To check for updates, players should first ensure that their game is fully updated, which can be done by checking for updates on consoles or via launchers such as Steam or Battle.net. Although updates are usually automatic, players should try restarting the game and manually checking for updates.
For PC players, it is also recommended to ensure that their operating systems and graphics cards are up to date. If everything is up to date, players can try verifying the game’s files to ensure that nothing has been corrupted. The “Scan and Repair” feature on Battle.net can be used, or in the worst case, players can reinstall the game completely to see if that resolves the error.
If these general troubleshooting techniques do not work, it may be time to wait for updates or news from the developers regarding a fix. Players can also help by reporting the error to the appropriate Activision help and support channels to assist the developers in identifying and resolving the problem.
READ MORE: Is It Free To Play Call of Duty Warzone 2
League of Legends Warding Overview, and Guide to Progress in the Game

Call of Duty: Warzone is a free-to-play battle royale game developed by Infinity Ward and Raven Software, and published by Activision. It was released in March 2020 and is available on Microsoft Windows, PlayStation 4, PlayStation 5, Xbox One, and Xbox Series X/S. In Warzone, up to 150 players compete in a last-man-standing battle royale mode set in the fictional city of Verdansk, which is loosely based on the city of Kastovia. Players can choose to play solo, in duos, or in teams of four. The game features a variety of weapons, vehicles, and equipment that players can find and use to eliminate other players and avoid the deadly gas that slowly encroaches on the play area.
Warzone also includes a Plunder mode, where players compete to collect cash by looting and completing contracts. The game features a unified progression system with Call of Duty: Modern Warfare, allowing players to earn experience and level up their rank, unlock new weapons and equipment, and customize their load-outs.
Best Loadout Options for Owen Gun

The Owen Gun is a submachine gun that was added to Call of Duty: Black Ops Cold War as part of the Season 1 update. Here are some loadout options that can work well with the Owen Gun:
Close-range domination loadout:
- Owen Gun with 9.1″ Extended barrel, Steady Aim Laser, and Speed Tape
- 1911 pistol with Dual Wield attachment
- Semtex grenade and Stun grenade
- Flak Jacket, Scavenger, and Ninja perks
This loadout is designed for close-range combat and rapid movement. The Owen Gun’s Extended barrel provides a bit more range while the Steady Aim Laser and Speed Tape attachments help with hip-fire accuracy and mobility. Dual-wielded 1911 pistols offer a good backup option for close-range engagements. Semtex and Stun grenades are great for flushing enemies out of hiding spots or stunning them for an easy kill. The Flak Jacket perk protects against explosive damage, Scavenger keeps ammo and grenades stocked up, and Ninja helps with sneaking up on enemies.
Versatile assault loadout:
- Owen Gun with 9.1″ Extended barrel, Field Agent Grip, and Quickdraw Handle
- A K31 sniper rifle with a 20″ Rapid Fire barrel and Royal & Kross 4x optic
- C4 and Flashbang grenade
- Flak Jacket, Tracker, and Ghost perks
This loadout is more versatile, allowing for mid-range engagements with the K31 sniper rifle and the Owen Gun’s Extended barrel and Field Agent Grip attachments providing improved accuracy and recoil control. Quickdraw Handle helps with fast aiming. C4 and Flashbang grenades provide some utility for dealing with enemies hiding behind cover or stunning them before an attack. The Flak Jacket perk is again useful for protecting against explosives, Tracker helps with locating enemies, and Ghost keeps you hidden from enemy UAVs.
Stealth loadout:
- Owen Gun with 7.6″ Task Force barrel, Silencer, and Steady Aim Laser
- 1911 pistol with Silencer and Dual Wield attachment
- Smoke grenade and Stun grenade
- Flak Jacket, Ghost, and Ninja perks
This loadout is all about staying off the radar and taking enemies by surprise. The Owen Gun’s Task Force barrel and Silencer attachments provide increased damage and suppress the weapon’s sound signature. Steady Aim Laser helps with hip-fire accuracy, and the Dual Wield 1911 pistols offer a good backup option. Smoke grenades can be used to obscure vision and create distractions, and Stun grenades can help with disorienting enemies for an easy kill. Flak Jacket protects against explosive damage, Ghost keeps you hidden from enemy UAVs, and Ninja muffles your footsteps.
Heavy hitting loadout:
- Owen Gun with 9.1″ Extended barrel, Field Agent Grip, and Fast Mag
- Magnum pistol with Speed Tape and Steady Aim Laser
- Frag grenade and C4
- Flak Jacket, Quartermaster, and Gearhead perks
This loadout is all about delivering heavy damage to enemies. The Owen Gun’s Extended barrel and Field Agent Grip attachments provide improved accuracy and recoil control, while Fast Mag helps with faster reloads. The Magnum pistol is a hard-hitting secondary with the Speed Tape and Steady Aim Laser attachments. Frag grenades can be used to take out enemies at a distance, while C4 can be used to destroy vehicles or take out groups of enemies. Flak Jacket protects against explosive damage, Quartermaster helps with resupplying equipment, and Gearhead reduces the cooldown of Field Upgrades.
READ MORE: World of Warcraft: Dragonflight, Contagious Cowardice Overview and Way to Treat It